Introduction
In today’s digital age, having a functional and user-friendly website is essential for any business. Shopify is a popular e-commerce platform that allows businesses to create and manage their online stores with ease. One common task that Shopify store owners often need to perform is changing their website link. Whether you’re rebranding your business or simply want a more user-friendly URL, this guide will walk you through the process of changing your website link on Shopify.
Table of Contents
- Understanding the Importance of a Custom URL
- Step 1: Log in to Your Shopify Account
- Step 2: Access the Online Store Settings
- Step 3: Change Your Primary Domain
- Step 4: Update DNS Settings (if necessary)
- Step 5: Monitor for DNS Propagation
- Step 6: Test Your New Website Link
- Common Issues and Troubleshooting
- Benefits of a Custom Website Link
- SEO Considerations
- Updating Links Across Your Website
- Redirecting Old Links
- Social Media and Marketing Implications
- Maintaining Consistency
- Conclusion
Understanding the Importance of a Custom URL
Before we dive into the steps, let’s discuss why having a custom URL is essential. A custom website link not only enhances your brand identity but also makes it easier for customers to remember and access your site. It can also have a positive impact on your SEO efforts, as search engines favor websites with user-friendly URLs.
Step 1: Log in to Your Shopify Account
To get started, log in to your Shopify account. If you don’t have one, sign up for an account first.
Step 2: Access the Online Store Settings
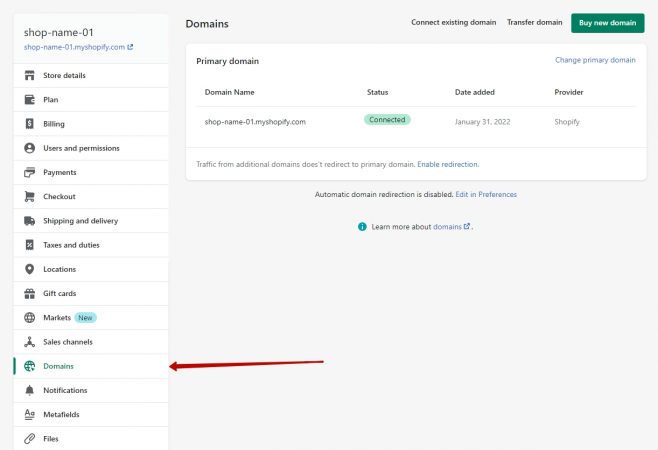
Once logged in, go to your Shopify dashboard. Click on “Online Store” in the left-hand menu and select “Domains.”
Step 3: Change Your Primary Domain
In the “Domains” section, you’ll see your current primary domain. Click on “Change primary domain” to begin the process of changing your website link.
Step 4: Update DNS Settings (if necessary)
Depending on your domain provider, you may need to update your DNS settings to point to Shopify’s servers. Follow Shopify’s instructions or consult your domain provider’s support for guidance.
Step 5: Monitor for DNS Propagation
DNS changes can take some time to propagate across the internet. Be patient and monitor the progress using online tools or your domain provider’s dashboard.
Step 6: Test Your New Website Link
After DNS propagation is complete, test your new website link to ensure it’s working correctly. Click on it, navigate your site, and check for any broken links or issues.
Common Issues and Troubleshooting
Encountering issues during the process? We’ve compiled a list of common problems and their solutions to help you navigate any challenges.
Benefits of a Custom Website Link
Discover the advantages of having a custom website link, from improved branding to enhanced user experience and SEO benefits.
SEO Considerations
Learn how changing your website link can impact your SEO efforts and what steps to take to maintain or improve your search engine rankings.
Updating Links Across Your Website
Find out how to update internal links and ensure consistency across your website after changing your primary domain.
Redirecting Old Links
Learn the importance of setting up redirects for your old links to avoid losing traffic and maintain your SEO rankings.
Social Media and Marketing Implications
Explore how changing your website link affects your social media profiles and marketing campaigns, and strategies to mitigate any negative impacts.
Maintaining Consistency
Discover why it’s crucial to maintain consistency in your website link and branding across all platforms and marketing materials.
Conclusion
Changing your website link on Shopify is a manageable task that can significantly enhance your online presence. By following the steps outlined in this guide and considering the associated benefits and implications, you can successfully transition to a custom website link that aligns with your brand and business goals.


